

When Life Gives You Lemons...Make Petit Fours?
A return to ambitious cake decorating

What to expect in today’s newsletter:
Topsy turvy cakes, a physics-defying culinary feat
Millie 4 life
Little Debbie Zebra Cakes made me who I am
My approach to making lemon petit fours
When I was a teenager I was absorbed with decorating elaborate cakes. Sometimes I got paid for it, but mostly I wanted to practice and share it with family and friends. Perfectly piping frosting on a crisp-edged cake helped me channel my need for control and order. The first cake decorating project I gave myself was to create a topsy-turvy Jack Skellington cake for Halloween. Topsy turvy cakes were so. hot. circa 2010.
At the time, I was about 16 or 17 years-old and worked in the community college I attended. I remember working a shift at my job, spending the entire time planning this cake (it was a slow day). Youtube tutorials on how to construct a topsy turvy cake were studied, sketches were drawn, and plans for the ingredients were made. I remember feeling such intense butterflies in my stomach, wings flapping stronger with every minute that passed. I absolutely could not wait to get home and make this fucking cake.
This should tell you all you need to know about who I was as a teenager, btw.

The cake had 3 layers, each covered in a fondant I made from scratch (I’ve never used fondant again because this project helped me realize that fondant, even homemade, is very bad in a myriad of ways). The colors were black (again—don’t do it), purple, and white. Each layer had a different pattern—I think one was white and black stripes, another had piped spider webs (spooky!), and the middle was a solid purple. I don’t have a picture of said physics-defying cake marvel, so here’s this excellent drawing. Needless to say it was, to this day, one of my biggest accomplishments.

It’s been forever since I’ve decorated a cake and I thought it would be appropriate to get back into it with a nice, finicky project like Petit Fours. While doing research for this I had an epiphany.
Little Debbie Zebra Cakes are basically Petit Fours! (Claire Saffitz apparently had this same epiphany recently, though before this she’d never eaten a zebra cake in her life???)
Memories of my childhood filled with Zebra Cakes came flooding in and wow did I have sophisticated taste from an early age. There was nothing more glorious than hearing the crackle of that cellophane package as I opened the white and black striped octagonal cake masterpieces. A light, pillowy cream sandwiched between two wonderfully soft cakes encased in a sweet layer of thin icing which held everything together with such delicate strength. They came in a few themed varieties—Christmas trees, hearts for Valentine’s day and ones that were red, white and blue for patriotism, of course.
It amazes me how memories can be buried for so long, and in this case, brought back to the surface because of a return to something that feels so instinctual, like ambitious cake decorating. In planning my petit fours I felt an excited nervousness bubble up. Like standing at the edge of an impossibly tall platform. There’s a resistance to the fall but an even stronger inclination to jump headfirst. If the cakes turn out unintentionally topsy turvy I’m harnessed in and safe to try again.

Cake
I used Erin McDowell’s cake recipe and encourage anyone who’s interested to reference it because she’s a cake witch.
9x9 cake tin
1 cup (2 sticks/226 grams) unsalted butter, at room temperature
1-1/2 cups (298 grams) granulated sugar
3 large (170 grams) eggs, at room temperature
1 teaspoon (5 grams) vanilla extract
2-1/4 cups (271 grams) all-purpose flour
1/2 teaspoon (2 grams) baking powder
1/4 teaspoon (1 grams) fine sea salt
1/2 cup (121 grams) whole milk, at room temperature
1/4 cup (60 grams) rose water (I used lemon juice, and I’m pretty sure this could be replaced with water or maybe even more milk)
Whip butter and sugar in a stand mixer (assuming you don’t want to do this by hand) until it’s become light in color and texture. Add eggs and vanilla. Combine dry ingredients together in a separate bowl. Alternate adding the dry ingredients and milk until everything is combined.
Grease and lightly flour the 9x9 pan, pour cake batter and use an offset spatula to create an even layer. Bake at 350 degrees for about 15-20 minutes until a toothpick check comes out clean. After about 15 minutes of cooling in the pan, flip it out onto a wire rack and let the cake cool completely. Once it’s cooled all the way through, cut it in half horizontally.
Lemon Jelly
however much juice 10 lemons yield
1 tbsp minced preserved lemon
1 tsp. gelatin
Heat the lemon juice until it slightly simmers, take it off the heat and add gelatin. With plastic cling wrap, line the pan that was used to bake the cake. Pour the lemon-gelatin mixture and chill in the fridge to set (~1-2 hours).
Candied Lemon
rinds from the 10 lemons that were juiced
3-4 cups of water, or enough to cover the lemon rinds
1 cup granulated sugar + more for coating the lemon peels
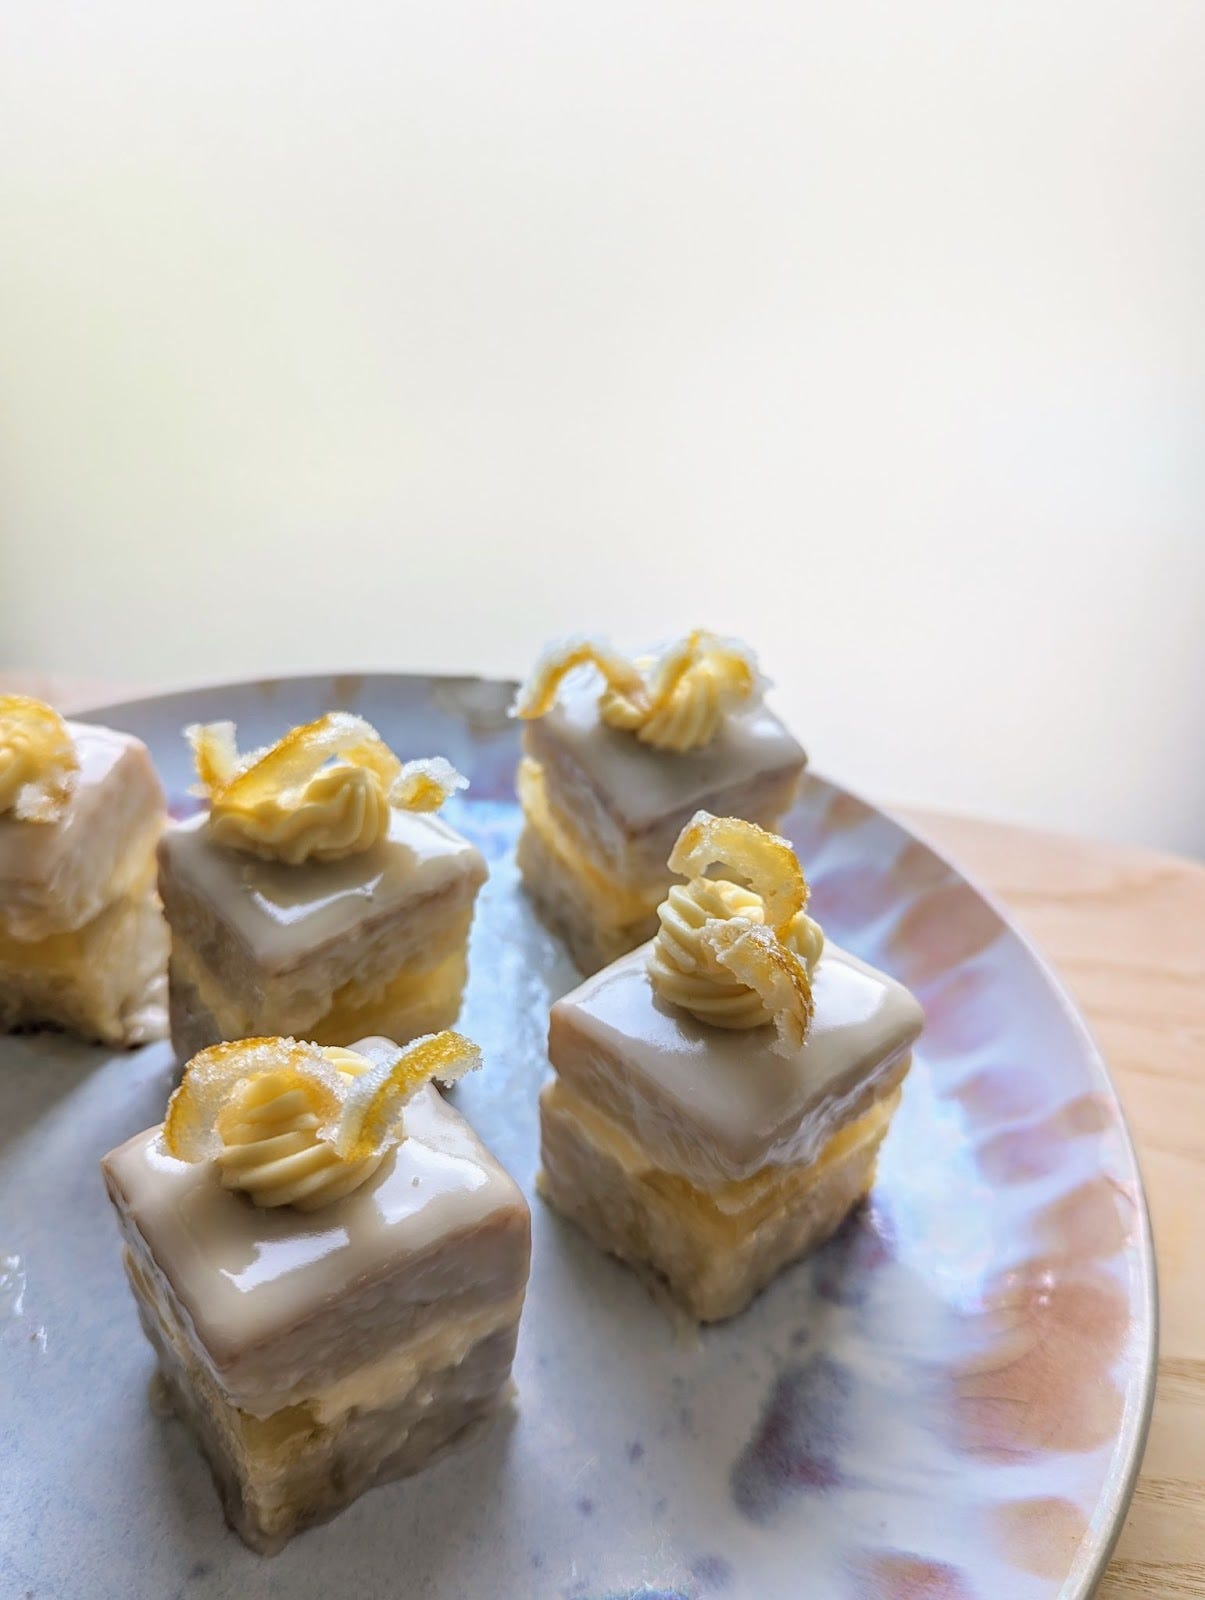
Julienne the lemon rinds into long strips and boil with water & sugar until they become translucent and soft. Remove the rinds from the water and apply sugar to coat while they’re still hot/sticky. I curled mine around chopsticks so they would be cute.

Russian Buttercream
Looking back, I wouldn’t have made this style of buttercream. It tasted amazing, but the texture became slightly curdled during chilling the cakes. I would probably go for an Italian or American buttercream in the future.
1 14oz. can sweetened condensed milk
2 sticks of butter
Combine both ingredients in a stand mixer with the whisk attachment and whip until it’s light, fluffy and becomes a frosting consistency.
Icing
8 cups (2 pounds/907 grams) powdered sugar
1/2 cup (165 grams) light corn syrup
2/3 cup (161 grams) water
1/2 teaspoon (3 grams) vanilla extract
This was the trickiest part in my opinion. Erin explained that the icing should be heated to reach the right consistency. Too thick and there won’t be good coverage of the cake, too thin and it’s going to slip off and not be substantial enough to harden the exterior of the cake. Next time I would probably just add more liquid rather than heating the icing because there’s a fine line between getting the perfect consistency and melting the frosting and heating the cake.
Assembly
The name of the game here is patience and chilllll. Chill the cake, chill the crumb coat on the cake, and most importantly, chill out in body, mind, and spirit. This dessert takes a lot of time and patience, you cannot rush any part of its assembly.
First, the cake should be baked, removed from the oven and cooled enough to take out of the pan and cut horizontally to create 2 layers.
Lemon jelly gets placed on the bottom layer of the cake. I didn’t put frosting between the cake layers with the jelly because I didn’t want the middle to be slippery, but I did pipe a wall of frosting around the entire perimeter to help keep things in place for when the cake chilled/set.
After placing the top cake layer on the bottom and lemon jelly layer, crumb coat the entire outside of the cake with the buttercream frosting and put in the fridge to chill. The buttercream should be firm to the touch.
Make the icing (also referred to as fondant but not the gummy kind) and get it to the right consistency which Erin explains what to look for here.
Once the cake has chilled, using a ruler, cut it into 36 equal squares measuring at 1.5” each.
Place a cooling wire rack on top of a parchment-lined baking sheet.
On the wire rack, place however many cakes you’re comfortable working with—I did about 6 at a time.
Let the icing set on the cake before moving on to your next batch.
Add candied lemon garnish once the icing is slightly set so it doesn’t fall off.
Your petit fours look amazing. The recipe sounds doable